

It seems pallet furniture is all the rage right now, so I thought I'd try my hand at it. These shelves are very easy to make and don't cost that much, especially if you can happen across a garden shop that has more pallets then they know what to do with and are willing to part with a few for free. They add a funky, rustic touch to any room and you can use them anywhere in your home, from your kitchen pantry to your bedroom.
What You'll Need (For 2 Shelves):
1 Pallet
4 Large picture hangers
4 50lb. picture hooks
12 1½" Wood screws
Circular saw
Hammer
Paint, stain or clear finish (optional)
Sandpaper (optional)
1. First thing's first, you need to find a pallet. I came across a small garden shop that listed on Craigslist. They had hundreds sitting in their back lot and had no idea what to do with them all. The owner was all too happy to let me take a few off his hands.
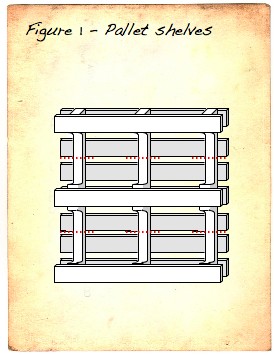
2. Once you get your pallets home, it's time to cut your shelves. Using your circular saw, cut through the boards as you see below. Be sure to only cut the vertical boards and not the horizontal ones.
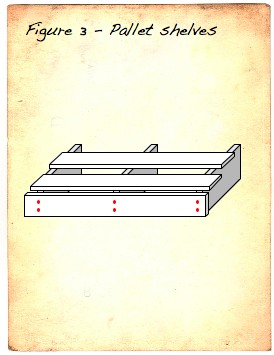
3. Once you're done sawing, it might be a good idea to clean off your pieces. The best way to clean them is with a scrub brush and little warm, soapy water. You should now have 2 pieces that look like this:

4. Next, we need to install the bottoms of the shelves. For this piece, you can either use a board salvaged from the pallet, or a fresh 1" x 4" board measured to fit the bottom of the shelf. Insert the screws in the areas shown below:
5. Now comes the fun part - the finish. I used an antique white, flat paint and antiqued them up a bit by sanding the corners and some rough spots along the front. For a more polished look, clean them thoroughly and choose a dark stain like mahogany. You can even leave them completely unfinished and for a weathered look. Once you've settled on a finish, go ahead and give it a go.
6. After your shelves have dried, turn them over the back side and attach the large picture hangers, one on each end of the top board as shown below:

7. Finally, install the 50lb. picture hangers on a clean wall and hang your shelves.
Ambitious :) Looks great!
ReplyDelete